Contributions from the following dates may be viewed:
May 16, 2020 YouTube "SCIMAT-Micro" channel established.
June 25, 2019 "Rice veeery much enlarged" YouTube video.
May 28, 2019 "Milk + Microscopy" YouTube video.
September 8, 2018 "A Bowl of Rice and SEM" paper published.
August 6, 2018 Breadfruit (Artocarpus altilis) composite starch granules.
June 6, 2018 Dr. Isaac Heertje Lifetime Achievement Award conferred on M. Kaláb.
Dec. 15, 2017 Microscopy of vegetables; collaboration with Canadian Blood Services; free access to Food Structure papers.
Sep. 21, 2015 Plasticizers in the material of blood transfusion bags may interfere with critical-point drying their samples.
Mar. 12, 2015 Conversion of RGB to CMYK for printing micrographs removes bright colour.
Mar. 11, 2014 Confocal laser scanning microscopy of some vegetables by Ms. Denise Chabot and Mr. Keith Hubbard. Hard-boiled egg yolk.
Nov. 16, 2012 Mr. Ann Fook Yang has retired.
Aug. 30, 2012 SEM of toxigenic Escherichia coli bacteria from. Dr. Kyriaki Chatzikyriakidou.
Oct. 2, 2011 A new paper by M. Kalab entitled The Beauty of Milk at High Magnification.
Nov. 25, 2009 Unhygienic conditions under the SEM.
Jan. 30, 2009 How to prevent charging artifacts in SEM of minute (1-10 micrometer) particles.
May 10, 2007 Harmful bacteria on leafy vegetables may hide in their stomata.
Feb. 28, 2007 3-D micrographs (anaglyphs: red and green or cyan or blue) how to make them.
July 20, 2006 Casein micelles in milk: negative staining, technical advice.
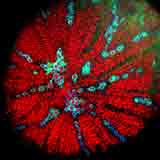
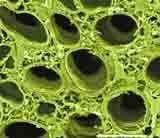
March 27, 2006 Red yeast rice, Monascus purpureus fungus, monacolin statin crystals, starch disintegration.
March 21, 2006 Alcian Blue and/or Ruthenium Red may retain mucus when doing SEM of bacteria in their natural environment.
October 12, 2005 Encapsulation of viscous samples prepares them for SEM.
October 6, 2005 Calculate the magnification of a printed micrograph from the micrometer bar value or from the width of the image in micrometers.
February 6, 2005 Environmental SEM has its limitations. Stachybotrys chartarum is shown well. Conventional fixation, dehydration, and critical-point drying turn unfixable mucus or slime onto filaments or flakes thus creating artifacts.
January 31, 2005 Limiting the incidence of artifacts in electron microscopy of various milk products. Freeze-fracturing vs. dry-fracturing.
January 25, 2005 How to interpret micrographs of milk products.
January 24, 2005 Transferring preparatory procedures to new samples not respecting their nature may produce artifacts.
January 23, 2005 Some amazingly harmful views of foods as harshly treated biological tissues which do not deserve great care while preparing them for electron microscopy from the early beginnings of food structure studies.
January 21, 2005 What has brought M. Kalab to electron microscopy: An absolutely ill-conceived project that, as a single scientist with one technician, he should make, in five years, marketable imitation hot dogs from skim milk powder by simply heat-inducing gelation of their slurries. He has failed but this nonsense plus great luck made him an expert in electron microscopy of milk products.
January 19, 2005 What are bacteria and what are micrometers.
Learn more about the subjects mentioned using the links below.
Any comments? Please send them to
Milos Kaláb, and mark the subject line "Microscopy comment". Thank you.
Antonie van Leeuwenhoek (1632 - 1723)
Robert
Koch - one of the two fathers of modern bacteriology
The
life and times of Louis Pasteur.
Paul de Kruif - a man of science
Escherichia
coli are common in the intestines of humans and animals and if
found in foods, they indicate fecal contamination. Very dangerous
O157: H7 and similar mutants can cause severe infections, even death.
Saccharomyces
cerevisiae ferment sugar and produce carbon dioxide and alcohol.
They are used to make leavened bread, beer, wine and other spirits.
Light (a stream of photons) is used in optical microscopes to magnify
the subject. A stream of electrons is used for this purpose in electron
microscopes.
The first transmission electron microscope
was developed between 1937 and 1939 by two postgraduate students
working in the Physics Department of the University of Toronto with
their physics professor.
Electron microscopy explained
TEM and SEM compared. Links to other kinds of microscopy.
There are two basic modes of electron microscopy (EM): scanning and transmission. Specimens destined for EM must not release gases or vapours during examination
Environmental scanning electron microscopy
(ESEM) makes it possible to examine hydrated (water-containing)
specimens if the water is confined to cells. Excellent images are
obtained with fresh insects and plants or their parts. ESEM is, however,
not suited for specimens which contain free water, such as cheeses,
meat products, juicy fruits, etc.
Scanning tunneling microscopy, Atomic force microscopy, and other techniques to study the microstructure of surfaces.
Food Science.
Microstructural Principles of Food
Processing and Engineering - a book by Jose M. Aguilera and David W. Stanley.
Structure of Dairy Products
- a book by Adnan Tamime.
Viewers interested in microscopic images of various subjects may wish to visit some of the following sites which specialize in science:
Best Microscope Photos of the Year 2016, - 10 Amazing Microscopic Images from the Natural World, White Blood Cells Vs. Bacteria, etc.
Microscopy Websites compiled by the National Health Museum, Resource Center.
Dennis Kunkel Microscopy, Inc.
The science image library holds over 1,500 light microscopy images and
electron microscopy images (colorized and black & white).
Molecular Expressions TM offer one of the Web's largest collections of optical microscope images (micrographs) in colour.
MicroAngela Electron Microscope Image Gallery.
Explore familiar and unexpected views of the microscopic world with
colourized images from electron microscopes at the University of Hawaii. This site has been archived by the Wayback Machine, which has now over 308 billion web pages in its archive.
Electron Microscopy Black and white transmission electron microscopy images of normal cells and organs and neoplasms. Please click on the items in the "Structure" column.
Microscopy UK Resources Links to various resources
David Scharf's Images
The author is known in the scientific and photographic commu- nities
for his work which has been shown in numerous magazines and museums.
There are also other commercial sites called photo banks which have large quantities of micrographs in their searchable archives, e.g.:
Science Source has 4 collections, each with a large collection of micrographs:
Science,
Nature,
Medical,
and
Videos.
Visuals Unlimited is a leading source with a wide variety of images including micrographs.
Science Photo Library presents special photo techniques, images in action, press releases, feature stories etc.
Shutterstock advertizes 176 millions of images, video clips, and music tracks.
iStock by Getty images etc.
Complete book of the microscope.
Step-by-step microscope activities for children include preparing
slides and observing everyday objects, insects and even your own cheek
cells.
|
May 16, 2020.
YouTube: "SCIMAT-Micro" Channel Established
|
Following two early videos mentioned below, a new Youtube SCIMAT-Micro channel has been established to include other videos by this author in one channel. Videos on the same subjects in Czech are also included in this channel. Direct links to all authors videos are here even if they are not directly related to food structure. Of particular interest, however, may be the author's experiments, in which a high-resolution office flat-bed scanner (4800 dpi and higher) was used to obtain macro photographs of foods in granular form, such as edible seeds - intact and ground, breadcrumbs, tapioca, various kinds of flour and also salt and monosodium glutamate crystals. In an expanded study considered for publication, excellent macro photos of couscous and slices of a variety of breads have been obtained. Images taken at 4800 to 9600 dpi processed by Adobe Photoshop to 100 to 200 dpi macro photographs reveal interesting details. They are also useful to check for contamination with alien particles.
June 25, 2019.
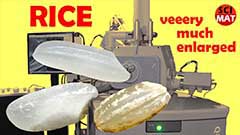
YouTube: "Rice - white, brown, parboiled, instant, puffed, red yeast rice - under an SEM"
|
Based on the paper "A Bowl of Rice and SEM" announced below, this Youtube video presents macrophotographs and SEM micrographs of various kinds of rice with the author's comments. What is most interesting? The fragments of the bran layer on the surfaces of steamed brown rice, the micro-porosity of instant rice although it looks quite glassy, and minute crystals of a natural statin on the surfaces of red yeast rice grains, produced by the Monascus purpureus fungus. - The video consists of 20 composite slides and is 15:42 min long. If you view it and like it, please subscribe to be informed about future videos by this author on foods under the microscope.
May 28, 2019.
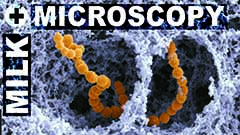
YouTube: "Bacteria in yogurt and other mysteries of milk products?"
|
Interactions of casein micelles and fat globules in milk lead to the production of dairy products such as yogurt, kefir, cheese etc. Lactic acid bacteria play an important role in these processes. Electron microscopy was used to show various dairy products. A project to develop hot dogs from skimmilk powder has, however, failed and the viewers of this YouTube video will learn why. The video is based on the presentation at the Food Structure and Functionality Forum and the International Dairy Federation Joint Congress in Montreal in June 2018, which the author made to thank for the Dr. Isaac Heertje Distinguished Scientist Award. The video consists of 36 slides and is 24:25 min long. If you view it and like it, please subscribe to be informed about future videos on foods under the microscope.
September 8, 2018.
|
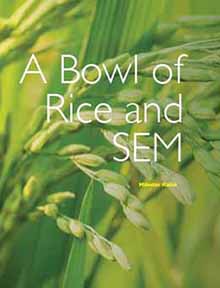
A Bowl of Rice and SEM paper published on September 1, 2018
|
Infocus Magazine - Proceedings of the Royal Microscopical Society in the U.K. published the paper on rice in issue 51 on pages 13-36. The abstract states that Scanning electron microscopy (SEM) was used to take a closer look at some of the most important components of rice grains such as tightly packed starch granules and minute protein bodies. Also examined was the microstructure of natural and processed grains such as parboiled (converted), instant, and puffed rice, rice flour, and a bran by-product. Natural monacolin statin present in red yeast rice was found in the form of minute crystals on the grain surfaces whereas the endosperm was filled with partially to severely degraded starch granules and a mass of dry Monascus purpureus hyphae. 32 illustrations, 20 references, 29 internet links. The paper will be available after September 1, 2019. If professionally interested in a 7 MB reprint, please let me know your interests and address your request to the author.
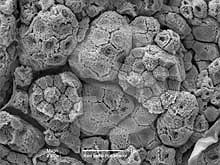
August 6, 2018.
|
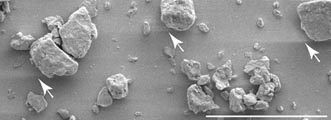
Breadfruit starch granules in beadfruit flour reveal their composite nature
|
Breadfruit (Artocarpus altilis) is a species of flowering tree in the mulberry and jackfruit family which originated in the South Pacific and then has spread to the rest of Oceania. A single tree may produce 200 or more grapefruit-sized fruits per season. There are hundreds of breadfruit varieties.
The fruit is edible and may be consumed in many ways. Kayode Oyebode Adebowale et al. published a paper entitled "Functional properties of native, physically and chemically modified breadfruit (Artocarpus altilis) starch" in "Industrial Crops and Products 21 (2005) 343351" but no micrographs of the starch granuels have been shown. Related papers: A comparison with corn starch, Polarization microscopy, SEM images, etc. may be found in Google Scholar.
According to Julia F. Morton (1987), "breadfruit has been attracting the attention of gourmets and some islands have been making small shipments to the United States, Canada and Europe for specialized ethnic markets". A sample of breafruit flour was brought recently to the lab from Central America by a visitor who emphasized that the flour behaves like wheat flour during baking, yet it is free of gluten. Making the flour on a small scale has been described here:
1. Wash and peel breadfruit. Halve and remove heart. Cut halves into very thin slices, lay slices on drying rack in the sun to dry. Breadfruit must be brittle when properly dried.
2. Grind or pound breadfruit slices then pass through sieve several times (5 to 6 times) until a powder substance is obtained (leaving flaky remains).
3. Store powder and flakes in separate clean air tight jars and use as required.
Industrial production of breadfruit flour is only starting and is coping with many problems associated with the nature of the fruit.
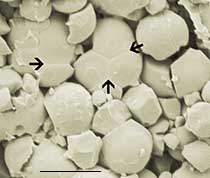
The SEM micrograph above shows several composite starch granules which had not been disintegrated but left almost intact following the milling process. Arrows indicate the seams where small particles are joined together to form larger oval granules. The three particles in the right upper corner have apparently been separated from each other. In this respect, the composite breadfruit starch differs from individual starch granules in grain flour such as wheat, corn, barley etc. and by its tight packing on a small scale it may resemble, to some extent, rice starch. Bar: 10 µm.
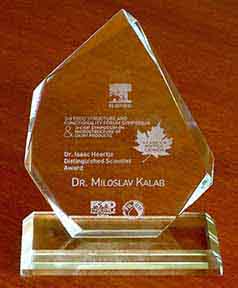
June 6, 2018.
|
The Food Structure and Functionality Forum conferred the Dr. Isaac Heertje Distinguished Scientist Award on the author of this blog on June 6, 2018.
|
The Dr. Isaac Heertje Lifetime Achievement Award was established in 2014. It bears the name of an accomplished scientist, Dr. I. Heertje.
The key paper on food structure mentioned in the English translation from Dutch in the previous link is available here. Dr. Heertje's important contribution to the publication of an earlier journal Food Microstructure - Food Structure as the former European Editor is part of the history of the journal.
The awardee was unable, for healh reasons, to accept the Award in person at the Food Structure and Functionality Forum Congress in Montreal and submitted an overview of his lifetime achievements in the form of a video PowerPoint presentation. It was then submitted to ResearchGate in the form of a PDF file entitled The 3rd Food Structure and Functionality Forum Symposium and the 3rd IDF Symposium on Microstructure of Dairy Products, which is, regrettably, accessible only to registered readers. Registration is free and, thus, provides free access to an immense wealth of scientific information in a wide range of disciplines.
The PowerPoint presentation lasts 15 min and consists of 22 illustrations with explanations of some crucial situations in the Awardee's scientific career and links to associated papers deposited at ResearchGate.
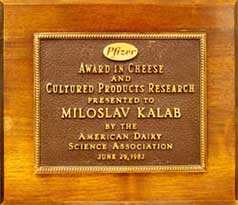
Thirty six years earlier, on June 29, 1982, the American Dairy Science Association had presented M. Kaláb with the Pfizer Award in Cheese and Cultured Products Research for his electron microscopy studies. This Cargill Flavor Systems Food Specialties Award was received in the same year, when Dr. Om Johari with three American food scientists, Dr. S.H. Cohen, Dr. Eugenia A. Davis, and Dr. D.N. Holcomb and M. Kaláb from Canada started to publish a new scientific journal, Food Microstructure, in Chicago.
December 15, 2017.
| This website has been re-organized in 2017 to show the most recent text at the top followed by older contributions. |
Since this site had been last updated on September 21, 2015, the images of vegetables have been published as illustrations of a paper entitled Colourful vegetables - colourful micrographs. Some time ago, the author joined ResearchGate, which is a social network of researchers whose achievements may be accessed by registered members. The registration is free for anyone. His most recent manuscript entitled "A bowl of rice and SEM" on the microscopy of rice will be published in "infocus" in Septermber 2018. Some of the illustrations have already been shown in greyscale in this column.
In addition to studying rice and other agricultural products, the author also collaborated with a group of scientists led by Dr. Sandra Ramirez-Arcos at the Canadian Blood Services, particularly Dr. Mariam Taha and Dr. Maria Loza. Some of his notes in this column may, thus, be related to various subjects.
In the past year, the autor also gathered information on his scientific and technical papers to be listed in his ResearchGate profile and he spent time featuring the journal Food Structure (1982-1993) in Wikipedia. When his younger colleague, Dr. D.J. McMahon, digitized all papers which have been published in the journal in order to make them freely available to all people interested in food structure, the author has facilitated the access. Readers may search for papers of interest by authors or by subjects in the Tables of Contents (or here) and then download them from the Utah State University Libraries.
Visitors to this site may also wish to search the home page for subjects of interest.
September 21, 2015.
| Does the presence of a plasticizer in a sample cause problems to SEM?
|
Biofilms composed of human blood platelets (thrombocytes) and bacteria such as Staphylococcus epidermidis may be studied as they form on the walls of the transfusion bags. Sets of six 1 cm2 samples (called "coupons") were fixed in a buffered glutaraldehyde solution and dehydrated in a graded ethanol series. For transportation, the samples were stored in 70% ethanol for up to 3 days, then they were dehydrated in 100% ethanol and critical-point dried. A phenomenon not observed with other samples occurred when the coupons were at 40°C in the pressurized cell and CO2 gas was slowly released to complete critical-point drying. As the pressure decreased to approx. 1200 psi, the light passing through the pressurized cell became gradually obscured as if a thick fog developed inside the cell. Releasing more gas and reducing the pressure below 1000 psi cleared the cell completely.
There was a question as to whether the absolute ethanol was completely replaced with liquid carbon dioxide and whether no other volatile substance contaminated it. Decanting 70% ethanol from all samples and allowing it to evaporate has left a liquid residue which did not evaporate at 22°C in 3 days. A similar residue was obtained by evaporating absolute ethanol used in the last step when dehydrating the samples. It was assumed that the contaminant may have been a plasticizer which is used in the manufacture of some transfusion bags.
Apparently, the plasticizer vapour condenses in the form of minute droplets and forms a fog as the pressure in the pressurized cell is reduced. A small part of the fog may then settle on all surfaces in the cell including the specimens that had been critical-point dried and may affect the SEM images of the cells (platelets, bacteria). So far, no ill effects have been observed, but the phenomenon deserves a further study.
March 12, 2015.
| Following confocal laser scanning microscopy of vegetables, difficulties were experienced when vivid micrographs of fluorescing constituents were prepared for printing on paper. This was done by converting them in Adobe Photoshop from the RGB mode to the CMYK mode.
|
|
| "Gamut Warning" in Adobe Photoshop shows in grey which colours will not be available after the conversion from RGB to the CMYK mode. |
The micrographs shown in this article are all in the RGB (red-green-blue) mode. Most commercial printing processes work with images in another, CMYK, mode (cyan-magenta-yellow-black mode. The conversion (e.g., in Adobe Photoshop) introduces considerable changes which may be seen
here. Unlike graphic artists, who may start working on their images in the CMYK mode, photographic cameras produce images in the RGB mode. The loss of bright colours by the conversion is particularly clearly noticeable with the images of fluorescence, e.g., autofluorescence in a radish root shown by K. Hubbard above (left image in RGB mode, right image in CMYK mode). Adjusting the colours in the CMYK mode may bring the images somewhat closer to the originals but the fact bright colours are not available in the CMYK mode does not allow a perfect match. Blue and green colors are affected the most. (How to change colours in an image). A preview of the colours affect in available in Adobe Photoshop in View - Gamut Warning.
March 11, 2014.
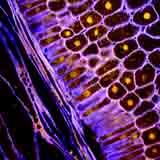
| Ms. Denise Chabot, Chief Technician at EMU, and Technician Keith Hubbard have expertise in all kinds of electron microscopy and also in confocal laser scanning microscopy (CSLM). Their colourful micrographs of vegetables are shown below.
|
|
| Autofluorescence CLSM image of a section from a carrot centre by D. Chabot. |
In the past several years, confocal laser scanning microscopy (CLSM) has figured prominently in the activities of the EMU staff. M. Kaláb gladly accepted the assistance and advice from Ms. Denise Chabot, the new Chief Technician, particularly in his new interest in the microstructure of vegetables such as carrots and other vegetables.

|
| Autofluorescence CLSM image of the skin of a raw tomato by D. Chabot. |
Vegetables are an important part of human nutrition. There is a growing evidence that a diet rich in fruits and vegetables is associated with a lower risk of some malignancies. Almost all parts of plants are considered to be "vegetables", from flower buds (e.g., broccoli, cauliflower) to leaves (e.g., cabbage, kale, lettuce, spinach) to stems (e.g., ginger, kohlrabi), stem leaves (e.g., celery, rhubarb) to roots (e.g., beets, carrots, radishes) to tubers (e.g., Jerusalem artichokes, potatoes, yams) to bulbs (garlic, onions) to seeds (e.g., beans, peas, sweet corn). Interestingly, some of the "typical" vegetables mentioned above are actually fruits in the botanical sense (cucumbers, eggplants, pumpkins, squash, tomatoes etc.).
|
| Colour-enhanced SEM image of a secton of a celery stalk by D. Chabot. |
Vegetables provide macronutrients (starch in tubers such as potatoes and in seeds such as beans, lentils), or inulin in Jerusalem artichokes, garlic, onions, dandelions etc.), and also micronutrients such as minerals and vitamins, antioxidants, flavours and other substances. Dietary fibre is an important group of substances present in the vegetables which are important for human wellbeing.
|
| Same image in CMYK mode (see the next subject on RGB vs. CMYK). |
|
| Autofluorescence CLSM image of a radish root by K. Hubbard. |
The interpretation of CLSM micrographs is not easy and is, in many instances, impossible even for experts knowledgeable of plant anatomy. Unlike SEM, which visualizes surfaces (e.g., a section of a celery stalk, above), CLSM registers substances in the specimens (e.g., a carrot section or tomato fruit skin) which fluoresce in specific areas of the ultraviolet (UV) light spectrum and display a variety of colours. A micrograph of a radish root obtained by K. Hubbard is such an example.
|
| Corn seed section stained for CLSM using Acridine and Calcofluor to induce fluorescence of the seed constituents by K. Hubbard. |
In contrast, a corn grain section stained with Acridine Orange (for DNA) and Calcofluor White for cell walls displays a well organized cellular structure.
|
| Brightfield microscopy of hard-boiled egg yolk by K. Hubbard. Bar: 200 µm. |
A food not examined by optical or electron microscopy earlier on this page is hard-boiled egg yolk. Granularity of the boiled egg yolk may be noticed by a naked eye. All egg lipids are actually concentrated in the egg yolk. The grains may be separated from each other and dispersed in vegetable oil. Light microscopy at right shows them as polyhedrons resulting from their tight packing in the yolk.
November 16, 2012.
| Mr. Ann-Fook Yang retired in 2012
|
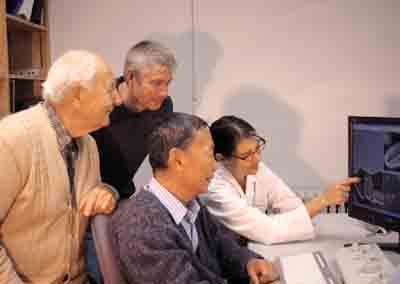
Mr. Ann-Fook Yang (in the front) was the Chief Technician at the Electron Microscopy Unit (EMU), Agriculture and Agri-Food Canada in Ottawa until he retired in November 2012 after 34 years of work in that position. In the snapshot at left, the new Chief Technician,, Ms. Denise Chabot, points to an image on an FEI Quanta 600 ESEM microscope while Technician Mr. Keith Hubbard stands behind. Miloš Kaláb looks from the back.
Mr. Yang will be remembered for many good deeds at EMU, for his assistance to many scientists and technicians and co-authorship of scientific papers and his own work, and also for two important acquisitions – a Hitachi 7000 transmission electron microscope and the FEI Quanta 600 ESEM.
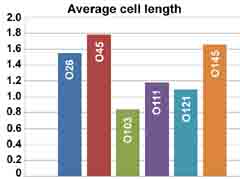
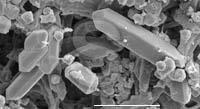
August 30, 2012.
| SEM of toxigenic Escherichia coli bacteria was used to evaluate their dimensions.
|
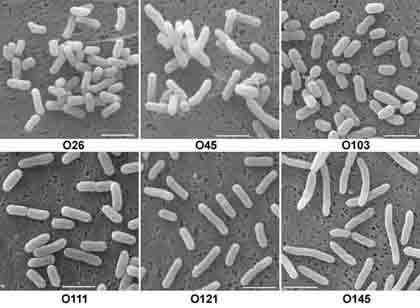 SEM images of six strains of toxigenic (hemorrhagic) E. coli
bacteria (O26, O45, O103, O111, O121, and O145) studied by Ms. Kyriaki Chatzikyriakidou
at the University of Wisconsin were obtained in sufficient quantities
to make statistical evaluation of their dimensions possible.
Characteristic images (at left) show differences expressed also in the form of a diagram (below). The lengths of the bacteria are expressed in micrometers with the scale at left.
SEM images of six strains of toxigenic (hemorrhagic) E. coli
bacteria (O26, O45, O103, O111, O121, and O145) studied by Ms. Kyriaki Chatzikyriakidou
at the University of Wisconsin were obtained in sufficient quantities
to make statistical evaluation of their dimensions possible.
Characteristic images (at left) show differences expressed also in the form of a diagram (below). The lengths of the bacteria are expressed in micrometers with the scale at left.
Ms. Chatzikyriakidou defended her thesis entitled "Behavior of Shiga-toxin-producing Escherichia coli (STEC) in beef and beef model systems under cold and acid stress" in December 2014 at the University of Wisconsin - Madison: "In the past decade, non-O157 Shiga toxin-producing Escherichia coli (STEC) strains have been implicated in an increasing number of foodborne outbreaks in United States of America, especially those related to beef, adding to the numbers of outbreaks caused by the well-known E. coli O157:H7. This research portfolio firstly compared the survival and growth of non-O157 STEC under cold- and acid- stress, and secondly explored the attachment of a variety of STEC strains to bovine collagen type I and myofibrils".
Now, interested in student psychology, she is doing biology education research at the same university, where she teaches a couple of classes for entry level research. In addition, she collects microorganisms in caves and photographs them using an optical microscope.
(Updated April 12, 2015.)
October 2, 2011.
After many years of examining milk products by electron microscopy, the major findings have been summarized in a paper entitled The Beauty of Milk at High Magnification (infocus, The Proceedings of the Royal Microscopical Society, issue 18 June 2010, pp. 4-37).
A new paper entitled Microscopy and Hygiene was published in the September 2011 issue, pp. 4-32. It is now available also on the Internet.
|
Micrographs in both papers and also in the review entitled Conventional Scanning Electron Microscopy of Bacteria
by M. Kaláb, A. F. Yang, and Denise Chabot (June 2008, pp. 42-61) have
all been rendered in false colours. The cover page of the infocus
June 2010 issue (at left) shows processed cheese (Fig. 17 in the paper)
where fat globules are seen in the process of emulsification. A
freshly developed calcium phosphate crystal is shown in blue colour.
The Royal Microscopical Society in the United
Kingdom welcomes submission of articles of general interest to
microscopists. Full articles or reviews ideally between 3000 and 4000
words contain images/figures, where relevant. There is no limit of the
number of colour images. All micrographs must include scale bars or
field widths and are expected to be submitted in CMYK colour mode. To
view the full guidelines for authors, please visit www.infocus.org.uk.
As the author, I thank Scientific Editor, Dr.
Adrian Burden, and Editor, Ms. Laura Kingsbury, and her team for the
beautiful form which they have given to my three contributions. They may
be contacted at editor@infocus.org.uk.
November 25, 2009.
|
The food we eat eventually leaves our body after having been digested
and depleted of nutrients. How has it changed during that process?
Profoundly. |
Digestion breaks down all food constituents.
Although our body extracts most nutrients, there is still enough of
them to support microorganism in the lower digestive tract, i.e.,
the large intestine. In fact, some bacteria are even beneficial for our
health. A wide variety of bacteria represent about one third of the
volume of the intestinal contents. This subject was already mentioned in
May, 2007. To view the bacteria under the SEM,
the excrements need to be prepared in the same way as other samples but
dry fracturing would be preferred to freeze fracturing.
Animal feces and bird droppings contain
microbial pathogens which appear in our environment due to the lack of
hygienic measures. The bacterium Escherichia coli
is present in the intestinal contents of most animals and is thus
called the "intestinal rod". When it is found in other environments, it
is an indicator that fecal matter is present.
The swine flu epidemic in 2009 has renewed
the interest in protecting our health. SEM images of unhygienic
conditions may, therefore, be educational.
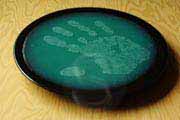 | | An imprint of a dirty human hand on a nutrient agar plate. Bacterial colonies developed where bacteria were tranferred from the hand onto the agar gel. |
 | | Bacteria are present in an old toothbrush along with decaying matter. Bar: 2 µm. |
Do we handle food with clean hands? An
unwashed hand imprinted on an agar plate with a nutrient medium created
an image of the hand within several days as the bacteria transferred
onto the plate developed into colonies. The image thus indirectly shows
the contamination of the hand with bacteria.
The foods which we bring home from a
foodstore also contain bacteria. Leaving a cut of meat to lie at room
temperature instead of placing it into a refrigerator ensures that
bacteria will grow on it and make it slimy and unfit for human
consumption.
Food enters our mouth which is already full of its own bacteria - on the tongue and on the teeth.
Older people clean their tongue and everyone brushes one's teeth. In
spite of washing the toothbrush too, bacteria take hold around the
bristles and propagate, forcing us eventually to replace the toothbrush.
The role of bacteria in the digestive system
has been the subject of scientific studies. Nowadays the tendency is to
colonize the system with probiotic, including lactic acid bacteria and bifidobacteria.
 | | SEM of an aerosol droplet dried on the wall of a toilet bowl. Bar: 0.2 mm. |
 | | Bacteria - mostly bacilli (rods) - in Canada goose droppings. Bar: 2 µm. |
In a civilized society, human feces are
flushed with water into a sewage system designed to decontaminate the
water and to compost the solid matter. A small part of the toilet bowl
contents becomes airborn in the form of aerosol droplets. The droplets
settle on the bowl walls and may travel out of it if the lid is not
closed down. Microscope cover slips attached to the bowl walls for
several days reveal the dry matter of the droplets. Some bacteria were
found at a high magnification but many were obscured by the fecal
solids.
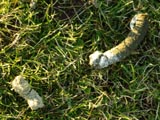 | | Canada goose droppings in grass. |
There are various sources of fecal matter in
our environment which cause the closing of public beaches after a heavy
rain which flushes animal and bird excrements into the river or lake.
In and around Ottawa and certainly elsewhere in North America, Canada
geese foul lawns, playgrounds, sidewalks, and river water with their
droppings of only partially digested grass. Because of high local
concentrations of the birds, bacteria in their droppings are a potential
health hazard. The situation is aggravated by visitors to municipal
parks who feed wildlife in spite of many signs advising them to resist
that urge.
January 30, 2009.
|
Preliminary coating of bacterial filters with gold may
also be used before the bacteria are captured on the filter to prevent
potential charging artifacts if the success of SEM is in jeopardy.
|
 Proper preparation of specimens
is essential to obtaining excellent SEM micrographs. The need to work
with very small specimens (~1.5 mm in diameter) was emphasized in
various connections, particularly if such specimens need to be fixed and
dehydrated. However, even small dry particles may be quite difficult to
prepare properly for SEM. Charging artefacts at left (white arrows;
bar=100 µm) are probably the best known problem. They originate when the
conductive gold coating on the specimen has gaps. Electrons hitting the
specimen cannot be discharged and their charge consequently deflects
the incident electron beam thus creating the artefact. This has already
been mentioned above in this webpage. Proper preparation of specimens
is essential to obtaining excellent SEM micrographs. The need to work
with very small specimens (~1.5 mm in diameter) was emphasized in
various connections, particularly if such specimens need to be fixed and
dehydrated. However, even small dry particles may be quite difficult to
prepare properly for SEM. Charging artefacts at left (white arrows;
bar=100 µm) are probably the best known problem. They originate when the
conductive gold coating on the specimen has gaps. Electrons hitting the
specimen cannot be discharged and their charge consequently deflects
the incident electron beam thus creating the artefact. This has already
been mentioned above in this webpage.
A double-sided sticky tape has been used to attach small
particles to the SEM stub. Additional painting of the particle side
walls with a conductive silver cement improves the contact between the
particle and the support. However, powder and dust particles are often
very small (<10 µm) and they sink into the dense sticky material of
the sticky tape.
One possibility to alleviate this problem is to dissolve
the sticky material in an organic solvent such as acetone or toluene
and to spread a droplet over a glass cover slip, 13 mm in diameter.
Evaporation of the solvent leaves a considerably thinner sticky layer
which may provide a good contact without submerging the particles too
deep (left image, bar: 200 µm).
Another possibility is to avoid the use of any binding
substance. The glass cover slip mounted on an SEM stub is sputter-coated
with gold while a small amount of the powder (such as very small pollen
grains, plant protein bodies, starch granule fragments) spread in a
single layer on another cover slip is only half-coated with gold (10
nm), the coating is stopped, the particles are stirred and spread again,
and gold-coating is completed. Then the particles are transferred onto
the gold-coated cover slip and a droplet of absolute ethanol is used to
spread the particles over the entire cover slip. Ethanol is then allowed
to evaporate and the particles are coated with a thin layer of gold
(~10 nm). This procedure ensures that there will be an electrically
conductive contact between the particles and the support so that
charging artifacts will not develop (right image, bar: 200 µm).
May 10, 2007.
|
The possibility that leaf vegetables, which are
consumed raw, may be contaminated with the feces of wild animals poses a
health hazard. It is aggravated by the fact that fecal bacteria enter
the leaf stomata and may not be washed out with water.
|
Escherichia coli bacteria
were found as regular harmless inhabitants of the human intestines in 1885
but one hundred years later, some of these bacteria were found to produce
Shiga-like toxins called verotoxins.
Such bacteria are called toxigenic and are marked as Escherichia
coli O157:H7. Lately they caused food
poisoning in North America when they appeared on leafy vegetables which
are consumed raw, such as lettuce and spinach.
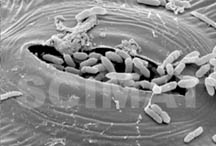  SEM was used to visualize the presence of E. coli on the leaves. For
illustration purposes, live nonpathogenic E. coli at very low
concentrations were reacted with lettuce and spinach leaves and then
fixed and photographed. It is interesting to note that particularly on
lettuce leaves the bacteria congregate at leaf stomata and even enter
them, thus hiding inside the leaves. It is evident that it would be
impossible to wash the bacteria out from the stomata. Compared to
lettuce leaves, spinach leaves (image at right taken at a lower
magnification) are considerably more convoluted and the bacteria may
hide in the convolutions. It would be equally impossible to wash them
out from their hiding places. Their nature, i.e., their adaptation to
life in the intestines makes it very easy for them to propagate in the
intestines if they are ingested with the leaves in the form of raw
salads.
SEM was used to visualize the presence of E. coli on the leaves. For
illustration purposes, live nonpathogenic E. coli at very low
concentrations were reacted with lettuce and spinach leaves and then
fixed and photographed. It is interesting to note that particularly on
lettuce leaves the bacteria congregate at leaf stomata and even enter
them, thus hiding inside the leaves. It is evident that it would be
impossible to wash the bacteria out from the stomata. Compared to
lettuce leaves, spinach leaves (image at right taken at a lower
magnification) are considerably more convoluted and the bacteria may
hide in the convolutions. It would be equally impossible to wash them
out from their hiding places. Their nature, i.e., their adaptation to
life in the intestines makes it very easy for them to propagate in the
intestines if they are ingested with the leaves in the form of raw
salads.
 Bacteria may not be identified from their SEM images, like in the micrograph
of human feces shown at left but this micrograph shows how plentiful the
bacteria are in the excrements and what proportion of the entire mass they
represent. It is no wonder that a small piece of an excrement may contaminate
a large volume of water. The micrograph also indicates that it is very
important to thoroughly wash one's hands after the use of a toilet. Bacteria may not be identified from their SEM images, like in the micrograph
of human feces shown at left but this micrograph shows how plentiful the
bacteria are in the excrements and what proportion of the entire mass they
represent. It is no wonder that a small piece of an excrement may contaminate
a large volume of water. The micrograph also indicates that it is very
important to thoroughly wash one's hands after the use of a toilet.
February 28, 2007.
Anaglyphs are pairs of superimposed stereograms, one
in red and the other in green, cyan, or blue, which give the
impression of a three dimensional object when viewed through a pair of
glasses of corresponding colours.
Anaglyphs are easy to make using a scanning electron microscope even at very high magnifications.
|
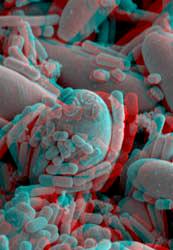 The image at left is an anaglyph
- a stereogram. When viewed through a pair of red-and-green glasses,
this image will reveal the three dimensional structure of the yeast
cells and bacteria on the surface of a kefir grain. The image at left is an anaglyph
- a stereogram. When viewed through a pair of red-and-green glasses,
this image will reveal the three dimensional structure of the yeast
cells and bacteria on the surface of a kefir grain.
At Christmas in 2006, my 7-years old grandson Adam showed me a
book full of photographs of spiders, where many of them were in the form
of anaglyphs. Using a pair of red-and-green glasses it was possible to
see the spiders as 3-dimensional creatures. Aerial photographs of mountains in museums have also been often shown in the form of anaglyphs.
In the past, when images in colour were extremely rare in food science journals, the 3-dimensional effect was obtained by printing pairs of micrographs which had been taken at a difference of 6 to 12 angular degrees. The easiest way to view them was through a simple optical apparatus but many people have learned to obtain the 3-dimensional effect simply by focussing their eyes behind the journal's page.
There is free software on the Internet and that has made the task easy. Examples of SEM anaglyphs and guidance how to make them may be accessed here.
Anaglyphs enhance the ability of the scanning electron microscope and
make it easier to evaluate vertical distribution of structural elements,
for example bacteria, spores, blood cells etc. Many interesting anaglyphs may be
found on the Internet, e.g., here, here, here, here, as an image of the bearded stonewort (Chara canescens),
or in Fig. 13 in a paper on the SEM of bacteria.
July 20, 2006.
Negative
staining may be claimed to be one of the simplest TEM techniques but
depending on the subject studied, it may appear to be quite demanding.
There are several critical points
such as:
1. The carbon-coated grids must be made hydrophilic.
2. Casein micelles must be preserved by fixation
and the presence of a dilute calcium chloride solution.
3. The micelles must be separated from whey proteins
by ultracentrifugation and then redispersed.
4. Proper ratios of the micelles and the negative
stain must be used and their excess removed.
5. The remaining thin layer of the liquid must be
freeze-dried to retain the globular shapes of the micelle.
|
 Recently I have received several requests for advice on negative staining of casein micelles
for subsequent transmission electron microscopy (TEM). The writers
complained that they have been obtaining fuzzy images. Regrettably I
have been unable to find exemplary micrographs of negatively stained
casein micelles on the Internet. However, I reprinted images of
negatively stained casein micelles (obtained from E. Uusi-Rauva at the
State Control Office for Dairy Products in Helsinki, Finland) in 1977
in an article
entitled "Electron Microscopy in Dairy Research" (MSC-SMC Bulletin, November 1977, pp. 4-10 - i.e. the Microscopical Society of Canada Bulletin). Then, 4 years later, I published my own micrographs (see below).
Recently I have received several requests for advice on negative staining of casein micelles
for subsequent transmission electron microscopy (TEM). The writers
complained that they have been obtaining fuzzy images. Regrettably I
have been unable to find exemplary micrographs of negatively stained
casein micelles on the Internet. However, I reprinted images of
negatively stained casein micelles (obtained from E. Uusi-Rauva at the
State Control Office for Dairy Products in Helsinki, Finland) in 1977
in an article
entitled "Electron Microscopy in Dairy Research" (MSC-SMC Bulletin, November 1977, pp. 4-10 - i.e. the Microscopical Society of Canada Bulletin). Then, 4 years later, I published my own micrographs (see below).
The text from my own publication (Electron Microscopy of Milk Products: A Review of Techniques by M. Kalab, Scanning Electron Microscopy 1981/III, 453-472 - SEM Inc., AMF O'Hare (Chicago), IL 60666, USA) reads as follows:
2. Transmission Electron Microscopy
TEM comprises all techniques in which the
specimen is placed in the electron beam and the enlarged shadow is
examined. There are various methods of preparing the specimen for this
kind of study.
2.1. Negative Staining
Negative staining is probably the easiest TEM
technique. The specimen is in the form of a suspension of
submicroscopical particles semitransparent to the electron beam.
Addition of phosphotungstic acid (PTA), sodium phosphotungstate, or
ammonium molybdate solutions (Ref.
64) to the suspension makes the medium but not the particles,
electron-dense. After a thin layer of the suspension is dried, the
electron beam passes only through the semitransparent particles under
study and is absorbed by the surrounding stain. The particles appear
light against a dark background in the micrographs (Fig 15). 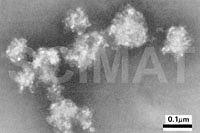
Irradiation of Formvar- and carbon-coated grids with ultraviolet light
or exposure to glow discharge (Ref. 65) make the grids wettable
for aqueous suspensions. Most suspensions are diluted prior to mixing with
the PTA solution to prevent overlapping of the particles. A proper pH of
the mixture is also an important factor. A preliminary fixation with formaldehyde
(Ref. 65, 67) or glutaraldehyde (Ref. 29) is advisable particularly with
casein micelles.
Interfering whey proteins are separated from casein
micelles by ultracentrifugation and washing of the sedimented casein micelles
prior to their negative staining (Ref. 68).
A suspension under study is usually mixed with an
equal volume of a 2% PTA solution and a small droplet of the mixture is
placed on prepared grids. Excessive liquid is removed after several minutes
by touching the droplet with a piece of a filter paper and a thin layer
of the mixture left on the grid is allowed to dry for the electron microscopic
examination.
This technique is limited to dilute suspensions
and, hence, has been used mostly to study the ultrastructure of casein
micelles (Ref. 66, 67, 68), lipoprotein membrane fragments (Ref.
69), and bacteriophages (Ref. 70) in lactic cultures.
As PTA penetrates porous particles such as the casein
micelles, it shows their corpuscular ultrastructurfe in great detail.
Calapaj (Ref. 66) used negative staining
to study the ultrastructure of bovine and human casein micelles in fresh
milk and in milk acidified with lactic acid.
Uusi-Rauva et al. (Ref. 67) examined the
effects of various pasteurization and storage temperatures on the disintegration
of casein micelles into their subunits. Recently, Creamer and Matheson
(Ref. 71) showed by negative staining that casein micelles increased
in size with heat treatment, the effect being greater at higher pH and
higher temperature.
Surfaces of the casein micelles were found to be
more diffuse after heating to 403 K (130°C) than to 373 K (100°C).
Snoeren (Ref. 72) and Snoeren et al. (Ref. 73) used negative
staining to study interactions of milk proteins with kappa-carrageenan.
Keenan et al. (Ref. 74) found distinct morphological differences
between plasma membrane and milk fat globule membrane.
In biology, M. Nermut (Freeze-Etching Techniques
and Applications E. L. Benedetti and P. Favard (eds.), 274 pp., Société
Française de Microscopie Électronique, Paris, France, 1973)
showed that air-drying resulted in the collapse of influenza virus particles.
Freeze-drying of the negatively stained preparation (rather than air-drying)
preserved the globular shapes of the particles. It is almost certain that casein micelles also become flattened and disfigured
during air-drying, so freeze-drying would be highly recommended.
Disintegration of the casein micelles during negative
staining as well as during preparation for shadowing with platinum and
carbon may be prevented by adding calcium chloride to the diluted milk
as suggested by Rose and Colvin (Ref. 75, 76).
References related to negative staining:
29. Carrol RJ, Thompson MP, Nutting GC: Glutaraldehyde fixation of
casein micelles for electron microscopy. J. Dairy Sci. 51, 1903-1908,
1968.
66. Calapaj GG: An electron microscope study of the ultrastructure
of bovine and human casein micelles in fresh and acidified milk. J.
Dairy Res. 35, 1-6, 1968.
67. Uusi-Rauva E, Rautavaara J-A, Antila M: Über die Einwirkung
von verschiedenen Temperatur Behandlungen auf die Caseinmicellen. Eine
Elektronen mikroskopische Untersuchung unter Verwendung von Negativfärbung.
Meijeritieteellinen
Aikakauskirja (Helsinki) 31, 15-25, 1972.
68. ShimminPD, Hill RD: Further studies on the internal structure of
the casein micelles of milk. Austral. J. Dairy Technol. 20, 119-122,
1965.
69. Stewart PS, Puppione DL, Patton S: The presence of microvilli and
other membrane fragments in the non-fat phase of bovine milk. Z. Zellforsch.
123, 161-167, 1972.
70. Knoop A-M: Milchforschung mit dem Elektronenmikroskop. Z. Lebensm.
Unters. Forsch. 168, 305-313, 1979.
71. Creamer LK, Matheson AR: Effect of heat treatment on the proteins
in pasteurized skim milk. New Zealand J. Dairy Sci. Technol. 15,
37-49, 1980.
72. Snoeren THM: Kappa-Carrageenan. A Study on Its Physico-chemical
Properties, Sol-Gel Transition and Interaction with Milk Proteins. NIZO
Verslagen, Ede, the Netherlands, 64-91, 1976.
73. Snoeren THM, Both P, Schmidt DG: An electron microscopic study
of carrageenan and its interaction with kappa-casein. Neth. Milk Dairy
J. 30, 132-141, 1976.
74. Keenan TW, Morré DJ, Olson DE, Yunghans WN, Patton S: Biochemical
and morphological comparison of plasma membrane and milk fat globule membrane
from bovine mammary gland. J. Cell. Biol. 44, 80-93, 1970.
75. Rose D, Colvin JR: Internal structure of micelles from bovine milk.
J.
Dairy Sci. 49, 352-355, 1966.
76. Rose D, Colvin JR: Appearance and size of micelles from bovine
milk. J. Dairy Sci. 49, 1091-1097, 1966.
Additional information on negative staining:
www.uga.edu/caur/temnote2.htm#a1
cryoem.berkeley.edu/~nieder/em_for_dummies/negative_stain.html
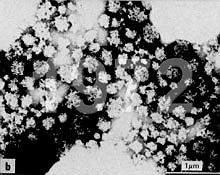
March 27, 2006.
|
Fungus Monascus purpureus growing on rice turns the grains red.
The product is called "red yeast rice". The grains are covered with
minute crystals of statins, substances known to reduce blood
cholesterol. Consumers of red yeast rice should be aware of its side
effects, particularly, if they make it at home. It is relatively easy to prepare, if a Monascus purpureus culture or fresh red yeast rice is available as the inoculum.
|
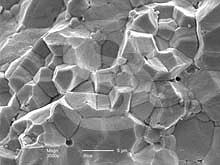
While examining long-grain rice starch by
scanning electron microscopy
for another scientist, I obtained specimens of many other kinds of rice
from my Chinese colleague, Mr. Ann-Fook Yang. Thus I also examined black
glutinous rice, short-grain rice, glutinous rice, scented rice, red
jasmin rice, and red yeast rice.
Rice starch differs by its shape from starch
granules isolated from other
sources such as wheat, corn, potatoes, beans etc. Whereas the latter
starches produce oval shapes as cross sections of the granules, rice
starch granules produce polygons (image at far left; bar: 5 µm). Rice
starch
is very tightly packed in the rice grain cells. The starch granules have
sharper edges in long-grain rice than in glutinous rice. A fractured
grain may reveal minute globular protein bodies among the starch
granules or
their imprints may be seen on the starch granules as minute dimples.
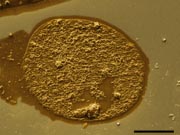
 Red yeast rice has a grain structure similar to that of the other rice varieties
but the starch-holding cells are loosened from each other and the starch
granules appear to be degraded or porous (image at left; bar: 10 µm).
Red yeast rice is produced in Asia by culturing a red fungus (Monascus
purpureus) on the rice grains and then drying the red product. Red yeast rice has a grain structure similar to that of the other rice varieties
but the starch-holding cells are loosened from each other and the starch
granules appear to be degraded or porous (image at left; bar: 10 µm).
Red yeast rice is produced in Asia by culturing a red fungus (Monascus
purpureus) on the rice grains and then drying the red product.
 The
fungus propagates on the rice grains and grows its hyphae deep into the
grain where they obtain nutrients. In this process, the grains cells separate
from each other and the starch granules degrade. The fungus produces Monacolin
K, also known as mevinolin, the same active agent (statin)
as in the cholesterol-reducing drug Lovostatin. The substance may be seen
in the form of plentiful minute crystals (bar: 10 µm) on the surface of the rice grains.
Red yeast rice has been valued in China for many centuries as a natural cholesterol
reducing herbal
medicine. It has been now produced and marketed in the West, where
it may have been accepted by patients who have switched to a natural
substance. There are, however, some important words
of caution, particularly an advice to consumers to take even red
yeast rice under medical
supervision because of possible side effects and to be even more careful
if pharmaceutical cholesterol-lowering medicines are also taken at the
same time. The
fungus propagates on the rice grains and grows its hyphae deep into the
grain where they obtain nutrients. In this process, the grains cells separate
from each other and the starch granules degrade. The fungus produces Monacolin
K, also known as mevinolin, the same active agent (statin)
as in the cholesterol-reducing drug Lovostatin. The substance may be seen
in the form of plentiful minute crystals (bar: 10 µm) on the surface of the rice grains.
Red yeast rice has been valued in China for many centuries as a natural cholesterol
reducing herbal
medicine. It has been now produced and marketed in the West, where
it may have been accepted by patients who have switched to a natural
substance. There are, however, some important words
of caution, particularly an advice to consumers to take even red
yeast rice under medical
supervision because of possible side effects and to be even more careful
if pharmaceutical cholesterol-lowering medicines are also taken at the
same time.
March 21, 2006.
|
Bacteria are everywhere. Would foods be safer, if the animals which we
eat (chickens, turkeys, pigs, lambs, steers) would contain only
"friendly" (probiotic) bacteria which would suppress microbial
pathogens? There are some experiments in progress in this direction.
|
The presence of
bacteria in chicken intestines may seem to be only distantly related to
foods. Every living creature has bacteria in its guts, so why to be
concerned?. Experts who care for the safety of foods for human
consumption would prefer if the bacteria in chicken intestines be
"friendly to humans" rather than pathogenic. There are indeed many
"friendly" bacteria and they are called "probiotic", such as lactic acid
bacteria (lactobacilli, lactococci) which utilize milk sugar lactose
and oxidize it into lactic acid. This acid then coagulates milk and
halps to produce sour milk, yogurt, kefir, cultured buttermilk and other
dairy product. In cheeses, lactic acid bacteria also participate in
their ripening. Leuconostocs are also part of lactic acid bacteria. They
may be found in sauerkraut and various pickled vegetables.
Bifidobacteria are another group of probiotic bacteria. Food safety
experts are interested to know whether probiotic bacteria could be used
to colonize the intestines and thus replace harmful pathogenic bacteria
such as salmonella, staphylococci etc. Cultivation and microbiological
identification would be used in such studies. Yet, it appeared
interesting for an electron microscopist to find the bacteria in their
niche. My objective was thus to find bacteria in the mucus which adheres
to the intestinal mucosa and even directly on the intestinal villi.
This means that I was not interested in the intestinal contents.
Traditional
preparation methods for SEM remove the intestinal mucus and show a clean
surface of the mucosa. Thus fixation of
the mucus is essential. The mucus consists of polysaccharides, so
fixatives different from glutaraldehyde must be used. In their studies
of intestinal mucus in young pigs, Paula Allan-Wojtas et al. (Microscopy Research and Technique
36:390-399, 1997)
successfully used Ruthenium red (RR) or Alcian blue (AB) added to a
glutaraldehyde fixative to retain the mucus. The authors illustrated
their paper with 30 micrographs, all taken at low magnifications to show
the mucus but not the microorganisms.
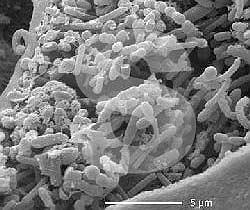 In our experiments, 1 cm2 intestinal samples were excised and fixed according to Allan-Wojtas et al.
Alcian blue produced beige specimens with very little mucus retained.
Ruthenium red produced purple specimens and both the mucus and the
resident bacteria were easy to find. The fixed samples were cut into 1
mm x 1 mm x 10 mm strips, dehydrated in ethanol, and freeze-fractured.
Examination of the fractures showed both the mucus and plentiful
bacteria, particularly in the caecum (see the illustration) and the
colon. Various shapes of the bacteria indicated than no single species
prevailed, although we are aware that bacteria cannot be identified from
their shapes alone. Microbiological procedures have been used for that
purpose. SEM showed bacilli (rods), cocci, clubs, spirochetes etc.
during an extensive search as the micrograph above at left shows.
Freeze-fracturing made it also possible to photograph the microvilli of
the intestines.
In our experiments, 1 cm2 intestinal samples were excised and fixed according to Allan-Wojtas et al.
Alcian blue produced beige specimens with very little mucus retained.
Ruthenium red produced purple specimens and both the mucus and the
resident bacteria were easy to find. The fixed samples were cut into 1
mm x 1 mm x 10 mm strips, dehydrated in ethanol, and freeze-fractured.
Examination of the fractures showed both the mucus and plentiful
bacteria, particularly in the caecum (see the illustration) and the
colon. Various shapes of the bacteria indicated than no single species
prevailed, although we are aware that bacteria cannot be identified from
their shapes alone. Microbiological procedures have been used for that
purpose. SEM showed bacilli (rods), cocci, clubs, spirochetes etc.
during an extensive search as the micrograph above at left shows.
Freeze-fracturing made it also possible to photograph the microvilli of
the intestines.
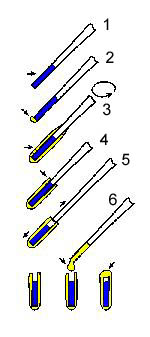
October 12, 2005.
|
It is easy to prepare solid specimens for scanning electron microscopy.
What about semisolid specimens such as coagulated milk (drinkable
yogurt, cultured buttermilk), egg yolk, etc.? Encapsulation in agar gel
tubes makes it possible to handle such specimens as if they are solid.
|
In the summer, I
received a request for SEM micrographs of cultured buttermilk and
stirred yogurt from an author who wanted to illustrate his chapters on
these products in his new book on cultured milk products.
 Semisolid products would disintegrate in the
aqueous solution of glutaraldehyde during fixation. There is, however, a
procedure whereby viscous samples may be fixed and further prepared for
SEM without any problem after they are encapsulated in agar gel capsules (schematically shown at left). This procedure, initially developed in 1968 by R. K. Salyaev (Proc. 4th Europ. Reg. Conf. Electron Microsc., Rome, II, 37-38) is suitable for various suspensions and emulsions including very soft centrifugation pellets.
Semisolid products would disintegrate in the
aqueous solution of glutaraldehyde during fixation. There is, however, a
procedure whereby viscous samples may be fixed and further prepared for
SEM without any problem after they are encapsulated in agar gel capsules (schematically shown at left). This procedure, initially developed in 1968 by R. K. Salyaev (Proc. 4th Europ. Reg. Conf. Electron Microsc., Rome, II, 37-38) is suitable for various suspensions and emulsions including very soft centrifugation pellets.
The sample is first aspirated in a pasteur
pipette (step 1), ~12 mm in diameter, and the end is closed with a small
piece of agar gel. A small droplet of an agar sol (concentration 3-4%,
temperature ~40°C) may be applied at the end of the Pasteur pipette in
the case of viscous samples (step 2). Then the Pasteur pipette is
briefly dipped into the agar sol and is immediately rotated to form a
thin layer of gel on the glass. This step (#3) is repeated several times
if necessary. Using a blade, the upper end of the gel is trimmed at the
upper end of the sample (step 4). Then the gel on the pipette is gently
taken into 3 fingers and the pipette is pulled away. Its contents stay
in the agar gel tube (step 5). Finally, a droplet of agar sol is placed
into the upper end of the agar gel tube to close the contents inside
(step 6). The sample is thus encapsulated and may be handled as a solid
sample. This means that the sample may be fixed, dehydrated, even
freeze-fractured, and critical-point dried.
 This procedure was used with many food samples
such as cultured buttermilk, drinkable yogurt, ketchup, and prepared
mustard, and also with samples such as suspensions of fixed bacteria,
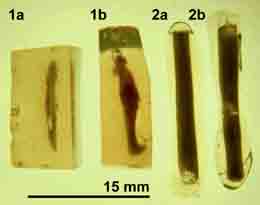
yeasts, and animal and bird droppings. However, there are microscopists, who consider this technique to be slow and difficult to perform. They encapsulate their samples in a different way. Grooves are made in an agar gel slab and then are filled with various samples. A layer of warm agar sol is poured over and is allowed to solidify. The solid agar gel block is then cut into smaller individual blocks (1a and 1b in the image at right). The author received such samples to examine and was not delighted. For a comparison, similar samples of coagulated milk were encapsulated using the Pasteur pipette procedure (2a and 2 b). Fixation and dehydration of these uniform cylindrical samples is more rapid and freeze fracturing produces fragments which are easier to mount and the resulting SEM micrographs are superior to the "faster encapsulation procedure".
This procedure was used with many food samples
such as cultured buttermilk, drinkable yogurt, ketchup, and prepared
mustard, and also with samples such as suspensions of fixed bacteria,
yeasts, and animal and bird droppings. However, there are microscopists, who consider this technique to be slow and difficult to perform. They encapsulate their samples in a different way. Grooves are made in an agar gel slab and then are filled with various samples. A layer of warm agar sol is poured over and is allowed to solidify. The solid agar gel block is then cut into smaller individual blocks (1a and 1b in the image at right). The author received such samples to examine and was not delighted. For a comparison, similar samples of coagulated milk were encapsulated using the Pasteur pipette procedure (2a and 2 b). Fixation and dehydration of these uniform cylindrical samples is more rapid and freeze fracturing produces fragments which are easier to mount and the resulting SEM micrographs are superior to the "faster encapsulation procedure".
October 6, 2005.
| Information
that an image in a magazine or a book is shown at a certain
magnification is true only in the case that the publisher calculated it
with respect to the size of the image printed. It is preferable to show a
micrometer marker or to indicate the width of the area enlarged in
micrometers. Projecting an image on a screen is a good example to show
that the true magnification changes with the size of the image
projected.
|
A few days ago, a
colleague asked me why I do not show bacteria on the tip of a needle, on
a computer keypad, on the edge of a drinking straw and similar objects
which "must be full of microorganisms". Of course, it would be
instructive to show such images - other people asked similar questions.
So let's look at the letters n or o
on the monitor in this text. They are a little over 1 mm wide.
Enlarging them 1000 times would make them 1000 mm = 1 m (about 3 feet)
wide. If these letters were coated with bacteria, they would look, at
that magnification, very small, like tiny dots or very short lines. To
show bacteria
as three-dimensional objects with flagella, I use magnifications
between 8,000 and 20,000 times. The letters "n" and "o" would each be 8
to 20 metres (24 to 60 feet) wide. The bacteria would then look like the
fingers of a little child. The tips of needles would look like a very
wide hills - not sharp at all. The background, to which the bacteria
were attached, would be irrelevant. To make viewers believe that
salmonella were photographed on chicken skin, it would be necessary to
assemble a montage (collage), where a micrograph would be superimposed
over a photograph.
 Scientists express magnification either by
stating the width of the image in micrometers (1 µm = 1/1000 mm) or by
showing a bar of a certain length (1 µm, 2 µm, 5 µm, 10 µm, etc.).
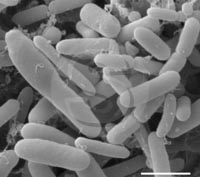
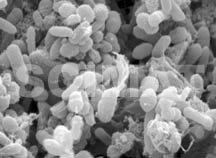
Lactobacillus acidophilus bacteria are shown
at two magnifications. At the higher magnification (image at left), the
2 µm bar is 16 mm long on my monitor. This means, that a 1 µm long
bacterium would appear 8 mm, i.e., 8000 µm long. The bacteria would,
therefore appear to be magnified 8000x. If your monitor shows a
different length, the true magnification can be calculated in the
following way:
Scientists express magnification either by
stating the width of the image in micrometers (1 µm = 1/1000 mm) or by
showing a bar of a certain length (1 µm, 2 µm, 5 µm, 10 µm, etc.).
Lactobacillus acidophilus bacteria are shown
at two magnifications. At the higher magnification (image at left), the
2 µm bar is 16 mm long on my monitor. This means, that a 1 µm long
bacterium would appear 8 mm, i.e., 8000 µm long. The bacteria would,
therefore appear to be magnified 8000x. If your monitor shows a
different length, the true magnification can be calculated in the
following way:
M = 1000A/B where
M = the true magnification in a print, a book, on a poster
A = length of the bar in mm (as measured by a ruler)
B = value of the bar in micrometers as stated on the micrograph or in the legend.
If the width of the image is given in
micrometers, a similar formula is used to calculate the true
magnification:
M = 1000D/E where
M = the true magnification in a print, a book, on a poster
D = the width of the image as measured by a ruler
E = value of the image width as stated in the legend.
The width D of the image above is 88 mm on my
monitor. It shows an area 11 µm wide (E). The magnification M =
1000x88/11 = 8000. The same result is obtained as by calculating the
magnification from the micrometer bar.
February 6, 2005.
| "Charging
artifacts" in SEM are caused by the accumulation of negative charge on
the specimen due to a defective conductive path for the electrons. This
charge deflects the incoming electrons and is manifested as light or
dark lines or white areas of no structure.
|
Last week, I was
showing an environmental scanning electron microscope to a food
scientist. He was excited to learn that such microscopes make it
possible to examine hydrated specimens. "How can it be done?" he
wondered, knowing well that specimens destined for electron microscopy
must not release any vapours or gases while they are being examined.
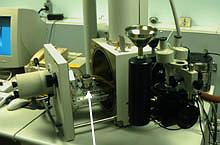 | | Specimen
stage (light arrow) in an open environmetal scanning electron
microscope (Philips ESEM XL30). (The black attachment with a funnel is
part of a cryo-SEM accessory).
|
It is a tricky
arrangement. In biological applications, the stage is cooled to around
the freezing point of water (0°C) to reduce the vapour tension above the
hydrated specimen and the air pressure is somewhat but not fully
reduced (<9 torr) around the specimen. This space of somewhat reduced
air pressure is surrounded with space where the pressure is
considerably lower. The electrons thus pass through high vacuum and only
the last few millimetres above the specimen they encounter higher
pressure.
The presence of water molecules in the
atmosphere around the specimen makes it possible to examine specimens
not coated with gold and yet, "charging artifacts" are no problem.
"This is great news for milk products and other
foods", my colleague happily exclaimed, thus repeating the reactions of
other food scientists. I am sorry to cool down this excitement.
Environmental scanning electron microscopes (ESEM) are excellent in
structural studies of hydrated specimens in which water is enclosed in
cells, such as insects or plants. Most foods, however, are not of this
kind. They contain "free" water at their surfaces which covers the solid
matrix composed of proteins (cheeses, meats), polysaccharides (fruits,
vegetables, starch gels), fats (butter, mayonnaise) or their mixtures.
Enlarging such surfaces by ESEM would not show the immersed solids. In
addition, many hydrated foods also contain volatile substances other
than water and may also contain free fats or oils. Such substances would
soon contaminate the column of the microscope and reduce its
efficiency. As I have already experienced it, subsequent examination of
dry, gold-coated specimens such as microorganisms at high vacuum at much
higher magnifications around 20,000x does not produce high-quality
images.
| Some
hydrated (water-containing) specimens may be examined in environmental
scanning electron microscopes (ESEM) without the need to be frozen or
dried. Excellent results are obtained with specimens where the water is
confined to cells such as insects or plants and their parts. It is not
suitable for moist foods such as cheeses or meat products.
|
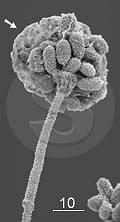 | | Fungus Stachybotrys chartarum by ESEM. Arrow points to water condensation on the spores. Bar: 10 µm.
|
Food-borne
microorganisms comprise bacteria and fungi (moulds and yeasts). Of these
two groups, moulds are good subjects for ESEM as a micrograph of Stachybotrys chartarum
shows at left, although the balance between temperature and air
pressure was not ideal. Some water condensed on the spores (arrow). The
opposite problem, drying, would collaps and flatten both the spores and
the hyphae.
In contrast, it is actually almost impossible
to show bacteria properly because they live in aqueous media. Their
surfaces may be covered with capsules which consist of polysaccharide
gels, or the bacteria have a variety of minute structures such as
fimbriae or flagella on their surfaces, all of which would retain free
water. ESEM would show the aqueous envelope. Because of the minute size
of the bacteria, it would be extremely difficult to adjust the
temperature of the specimen and the air pressure above it, as these two
factors determine whether water will evaporate from the sample (due to
increased temperature or reduced air pressure) or will condense on it
(decreased temperature and increased air pressure).
 | | "Ropy"
lactobacilli in yogurt. The filaments are artifacts which developed
whe"Ropy" lactobacilli in yogurt. The filaments are artifacts which
developed when the yogurt specimen was prepared for SEM.
|
However, photography of bacteria prepared for high-vacuum by fixation,
drying, and gold-coating is not free of artifacts. The polysaccharide
gel capsules shrink into filaments on dehydration thus producing
artifacts. No such filaments exist around the bacteria in their native
state. In the seventies of the past century, several dairy scientists
explained that some bacteria in cottage cheese use these filaments to
anchor themselves to the solid casein matrix to avoid being washed away
with the whey. The truth is that such bacteria (called "ropy bacteria")
developed thicker capsules. Their poly- saccharides retained more water
and increased the viscosity of cultured buttermilk or yogurt compared to
"regular bacteria". The polysaccharides turned into filaments during
the preparation of the specimens for electron microscopy. Since
dehydration in alcohol is also used in the preparation of specimens for
transmission electron microscopy, the filaments were shown by both
techniques and, thus, were believed to be genuine.
| Filaments
seen "to radiate" from bacteria in SEM micrographs of yogurt and
Cottage cheese are bacterial polysaccharide capsules shrunken during the
preparation of the specimens for electron microscopy. They are
artifacts.
|
January 31, 2005.
| Artifacts
happen - and no one is safe from them. If there is defective planning,
repeating the experiments will reproduce the artifact and fool the
researcher. |
One of the best
procedures to obtain excellent SEM images of the internal micro-
structure of foods such as yogurt, curd, cheese, and tofu consists of
fixing the specimen, preferably in the form of 1x1x10 mm prisms. The
prisms are then dehydrated in a graded ethanol series. When they are
impregnated with absolute (100%) ethanol, they may be frozen directly in
liquid nitrogen although, contrary to general belief, liquid nitrogen
is a poor cryogen. If a subject is immersed into it, liquid nitrogen
immediately forms a layer of gas around it thus insulating it and
reducing the freezing rate. Freezing hydrated specimens of this size in
liquid nitrogen always leads to the development of ice crystals. As they
grow, they ruin the original microstructure. Unlike water in hydrated
specimens, ethanol does not crystallize when immersed in liquid nitrogen
and forms glass-like ice. The frozen prisms are then fractured using a
pair of insulated tweezers (they are not available commercially but it
is easy to insulate them using short strips of duct insulation) and an
insulated scalpel. The 1x1 mm cross section of the specimens allows
rapid fixation and impregnation and the 10 mm length makes it possible
to obtain several good fragments. The fragments are returned into
absolute ethanol to thaw. Finally, they are critical point dried (CPD)
and mounted on SEM stubs.
Specimens such as curd or cheese which contain fat, need to be defatted
(the micrograph of Mozzarella cheese above was obtained in that way).
The specimens impregnated with absolute ethanol are extracted using
three changes of chloroform or n-hexane followed by three changes
of absolute ethanol. The specimens are then rapidly frozen, one by one,
fractured, and CPD. There is a crucial step when the fragments have to
be mounted on the SEM stubs: The fractured plane should be facing up for
an easy SEM examination. The fresh plane can be recognized as being
shiny in reflected light.
Why such a complicated procedure?
Wouldn't it be easier to examine the surface obtained by cutting the
specimen using a blade or a scalpel? No - the milk or soy proteins would
be smeared by the blade or scalpel on the cut surface and the images
obtained would show artifacts.
 | Dry-fractured
Havarti cheese. The fractured surface is not smooth. Concave globular
void spaces indicate where fat globules were located in the fresh
cheese. |
Why bother
freezing the specimens and fracturing them in liquid nitrogen? Wouldn't
it be easier to fracture the specimens after the entire prisms are
dried? Oh, yes, it would be easier to do dry-fracturing instead of
freeze-fracturing but the images would not be too useful to explain the
internal structure of the specimens. Dry fracturing would not proceed
along a new flat plane but along the weakest points in the internal
structure and the topography of the fractured surface would be very
coarse - please check here for information about dry-fracturing. Also check that site for animated ice crystal formation.
January 25, 2005.
| It
is very difficult if not impossible to show the true structure of a
specimen. Most preparatory steps alter that structure. Not all changes
may be considered to be artifacts.
|
As a microscopist
who has spent many years studying the microstructure of yogurt and
cheese, I should be able to produce images which would show their true
microstructures. They would probably be diagrams - but not micrographs.
It is not possible to place a small piece of yogurt or cheese under an
electron microscope and to expect an image of the true microstructure.
As already
mentioned, the samples examined by EM must not release gas or vapour.
That means that water and other volatile substances must be removed from
the sample. This can be accomplished in several ways (including samples
in the form of fine suspensions) such as
1. dehydrating and drying the sample and
1a. examining it by SEM, or
1b. replicating it with platinum and carbon, and examining the replica by TEM, or
1b. shadowing it with Pt and examining it by TEM, or
1c. embedding it in a resin, sectioning it and and examining it by TEM, or
2. freezing the sample, fracturing it while frozen, and
2a. examining it by cryo-SEM at a very low temperature, or
2b. replicating it with Pt and C and examining the replica by TEM.
3. The sample can alternatively be examined by so-called environmental
scanning electron microscopy (ESEM) which will allow it to retain its
aqueous phase.
None of these
procedures can show the structures of yogurt or cheese as they exist in
the "fresh" samples. Fresh samples contain water with various substances
(including lactose, lactic acid, inorganic and organic salts, milkfat
globules, and even bacteria) dissolved and dispersed in it. When we look
at a small piece of yogurt, we only see the "wet" surface.
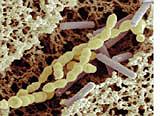 | | SEM
image of yogurt. Left upper corner and right lower corner show the
protein matrix of yogurt made by the action of bacteria: streptococci
(yellow) and lactobacilli (blue). |
To view the matrix
of casein particle chains in yogurt by SEM, the aqueous phase must be
removed from the samples. This means, however, that the microstructure
of the sample has been changed. Removal of the aqueous phase could lead
to a collapse of the structure unless the protein matrix is fixed. That
means, however, that a severe change to the original microstructure is
introduced. What should be done with the fat globules and droplets of
free fat which may be floating in the aqueous phase?
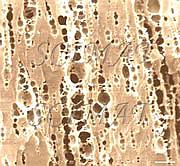 | SEM
image of Mozzarella cheese. The dark void spaces were occupied by fat
globules in the original cheese. Their removal shows the structure of
the protein matrix of the cheese and also the distribution of the fat
(that had been removed).
|
This
is a very important question in the case of curd and cheese. Fat cannot
be fixed by protein fixatives such as glutaraldehyde, but if it is left
unfixed, a part of it will be extracted by liquid carbon dioxide during
the critical-point drying procedure and the rest will obscure details
of the protein matrix. Researchers often prefer to extract all fat and
to study only the protein matrix. If the objective of the study is to
retain fat in the protein matrix, the fat must be fixed
using an osmium tetroxide fixative which also contains imidazole.
However, unless the fats and proteins are in distinctly different forms,
it may be very difficult to distinguish them from each other.
Preparation
procedures always alter the microstructure of the samples destined for
electron microscopy. Drying for SEM and embedding for TEM remove water,
freezing changes the water into ice and may cause ice crystal formation. If the change is intentional, it may allow certain features (e.g.,
details of the protein structure) to stand out. Such changes are not
called "artifacts". This term is reserved for unintentional changes
which occur due to negligence or omission.
January 24, 2005.
| Following
blindly protocols designed for certain biological tissue when working
with completely different specimens would not produce images of their
true microstructure.
|
As the Editor-in-Chief of the scientific journal Food Structure,
I reviewed a few manuscripts based on some kind of an idea as if there
was a uniform procedure for the fixation of all foods irrespective of
the composition, size, and microstructure of the specimens. Common sense
suggests, however, that it will take considerably more time for
glutaraldehyde or osmium tetroxide to penetrate a compact processed
cheese sample than a thin fat-free yogurt sample or that, of two
processed cheese samples, the one in the form of a prism with a cross
section of 1x1 mm may require 24 hours to get fixed with osmium
tetroxide whereas the other, in the form of a 5x5 mm cube, will not
be fixed even after 3 or 4 days. "If in doubt, get the answer to your
question by an experiment", I used to remind the authors. Osmium
tetroxide is particularly useful for that purpose. Leaving 1x1x10 mm
prisms of yogurt, low-fat cheese, and high-fat processed cheese in an
OsO4 fixative and fracturing a small part of each prism each
day will show the penetration of the fixative into the sample as a
gradually diminishing light core of the sample's cross section.
This approach also
concerns other procedures such as extraction, dehydration etc. It is
true that foods are altered biological tissues - and this fact has to be
respected. Ham is much denser than a live or dead muscle, cheese is much denser than yogurt.
January 23, 2005.
| Most
foods are severely altered (processed) biological tissues. In many of
them, the original source is not even noticeable. Example: Wedding cakes
do not show that they consist of processed grains (flour), eggs, milk
(butter, cream), or sugar cane (sugar) etc. Different bakers would
produce cakes of different microstructures. The microscopist must not
add to the changes already done to the product. |
My colleague's
willingness to instruct his technicians to teach me started a new
direction in my research. Since the early seventies I have been using
electron microscopes to study the development of structure in milk
products until the middle of the nineties. Later on, there was a greater
interest in the microorganisms which contribute to the manufacture of
milk and many other food products.
The high resolution of electron microscopy has helped to make advances
in medicine and in biology. It was introduced into food science relately
late. There was a rapid increase in the number of scientists using
electron microscopy in their studies. A journal "Food Microstructure"
was established in 1982 and later renamed "Food Structure". It was doing
very well, appearing quarterly, but in 1994 it vanished as the
publisher, "Scanning Microscopy International" in Chicago (USA) abruptly
stopped publishing it without giving reason. The findings of several of
my colleagues from those times may be accessed in the "Guest Food
Microscopists" sections 1, 2, and 3.
Commercial production of foods depends on a
good knowledge of the raw materials, ingredients, and the finished
products manufactured. Experts who modify existing foods and develop new
products need to know what affects the microstructure and how
microstructure, in turn, controls physical and sensory properties of the
food products. Such information may be obtained only by experiments -
so let's take some food samples and examine them in an electron
microscope.
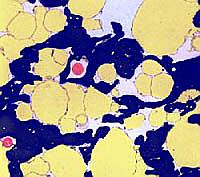 | | TEM
image of cheese shows a dense microstructure composed of compact
proteins (blue), clusters of fat globules (yellow) with the membranes
intact. Individual bacteria (red) are dispersed in the aqueous phase
(residual whey - white). |
While I searched
for information about the appropriate preparation of food samples
destined for electron microscopy, I heard opinions of this kind: "Foods
are very harshly treated biological tissues. Bread as well as cakes are
ground cereals mixed with other ingredients such as sugar, salt, milk or
water, partly digested by yeasts and finally damaged by high heat
during baking. Meat are muscles of dead animals, already decomposed to a
considerable extent. There is no comparison between fresh milk and a
piece of aged Cheddar cheese or ground Parmesan cheese. What kind of
care do you want to pay to preserve it? That's ludicrous".
Well, this is some kind of opinion. However,
almost any adult and even many children can distinguish between a good
and a bad piece of bread, ham, yogurt, cheese etc. Would an electron
microscope be helpful to show any important differences? Let's agree
that foods indeed are altered biological tissues but let's preserve
those changes made on purpose and let's not add additional
out-of-control changes.
There are many
conditions to be met if meaningful images (micrographs) of foods are to
be obtained from an electron microscope. The specimens placed in a
scanning or transmission electron microscope must not release any gases
or vapours in vacuo because volatile substances would absorb
electrons which are used to magnify the specimens (it is certainly
obvious that specimens destined for light microscopy should not release
smoke). There is one exception with so-called "environmental scanning
electron microscopes" (ESEM) which are constructed and operated to
examine hydrated biological samples. These microscopes are relatively
new to the field of electron microscopy.
Preparing the
specimens for electron microscopy means retaining their original
structure as much as possible and making them resistant to the harsh
conditions inside the microscope. Proteins are fixed (denatured under
controlled conditions) using specific fixatives, e.g., glutaraldehyde
and/or osmium tetroxide, or applying controlled heat-denaturation in a
special microwave oven. However, it makes no sense to subject
non-proteinaceous specimens such as starches or fats to a similar
treatment.
January 21, 2005.
| Electron
microscopy (EM) showed that gelled milk consists of globules called
"casein micelles". Such structures cannot be elastic - unlike structures
which consist of fibres. Additional EM studies indicate that the
microstructure of foods is related to some of their physical and sensory
properties. |
During my young
years, children did not have the luxury of having microscopes in their
bedrooms and we had to wait until high school to learn about them and
try them with a variety of subjects such as onion skin cells, home dust,
pollen grains, or yeast cells (Saccharomyces cerevisiae).
At the
Technical University in Brno, I studied technical microscopy as one of
the subjects in the first year of chemical engineering. At that time
(1949) it was, of course, optical or light microscopy and we examined
various fibres such as cotton, wool, silk, etc. Modern polyester fibres
only waited yet to be developed and electron microscopes were relatively
new high-resolution instruments, too expensive for universities.
In 1952, I
obtained my MEng. degree in chemical engineering, added more experience
in food science to what I had learned as a summer student and went back
to school (Slovak Academy of Sciences) to study pectic substances in
crabapples. In 1957 I started earning for my living for good. The
microscopes were forgotten for 15 more years - until the seventies.
At that time I was
a research scientist at a government food research institute in Canada.
I was assigned an objective to develop wieners from surplus skim milk
powder. It was like in a Czech fairy tale - there the heroes had to find
elusive golden-haired princesses, fireball birds, golden-mane horses,
or princesses turned into gem stones burried deep at the bottom of the
sea. However, each of these heroes had some kind of helper with
supra-natural powers - but I even did not have a technician.
The "hot dog" I
made from milk powder looked very fake. Only the pink colour and the
spicy smell could probably fool a potential customer. Otherwise it was
brittle - not elastic - and instead of being juicy like the comminuted
meat product, the milk powder imitation felt like a piece of bad cheese
in the mouth. "If I only knew how to look at the microstructure of the
two products", I sighed hopelessly, "then, maybe, I would understand,
what makes them so different".
Suddenly it
appeared that there was a helper with an almost supra-natural power -
the power to show the smallest protein particles in milk. They are
called "casein micelles"
and their dimensions are between 10 and 20 nanometers (nm). If
1 mm can be divided into 1000 µm, 1 µm can be divided
into 1000 nm. The micelles are so small that not even the best optical
microscope would show them. It would be as helpless as are our eyes when
looking down at bacteria.
A colleague, an
electron microscopist, examined my product and a real "meat-based"
wiener. Whereas the wiener consisted of meat fibres, its fake duplicate
made from milk powder consisted of tightly packed tiny globules.
Therefore, there was no elasticity whatsoever. "Please teach me how to
use your electron microscope, so I can investigate these foods in
greater detail and learn how their microscopical structure relates to
the manner we feel them in the mouth", I asked my colleague.
January 19, 2005.
| The books which children read, may affect them for life. Let them read about positive heroes. |
The world never
looked the same after the Dutch biologist Antonie van Leeuvenhoek assembled
glass lenses and created the first microscope.
When I was young
(I was born in 1929), scientists like Robert Koch were our heroes - people,
who were doing something beneficial for mankind. Dr. Koch was one of "the victors
over death" - death caused by bacteria. He saw them, particularly the bacilli of tuberculosis (Mycobacterium tuberculosis),
which were then called "Koch's bacilli". At the public school in
Czechoslovakia which I attended, we even had theatre performances which
showed us how the "bacilli" (represented by other children in white
costumes) were dangerous to human health but at the same time, they were
helpless and unable to harm us if we behaved properly, ate a balanced
diet, washed our hands after having used the toilet and before every
meal, and never tried smoking.
There were
many additional scientists such as Paul de Kruif and, in particular,
Louis Pasteur, who used microscopes for discoveries beneficial for the
mankind. I find the reading exciting even in these days of high
technology here and there and everywhere. Those early scientists had it
very difficult, particularly if human prejudice opposed their ideas and
experiments. One must admire their resourcefulness.
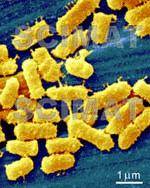
 Are bacteria indeed so bad that we have to be on
guard all the time? Of course, they are, at least a small but important
group of them, called "pathogens". As all microorganisms, they are
invisible to a naked eye, so we do not see as to whether our hands are
contaminated, that means whether there are bad bacteria sitting on them. They are the ones which can cause food
poisoning or food-borne illness. Just look at some of them at left,
enlarged several thousand times by a scanning electron microscope (right: a
multisample stage holding 4 bacterial specimens). More recently, bacteria found in various unhygienic situations were examined by SEM.
Are bacteria indeed so bad that we have to be on
guard all the time? Of course, they are, at least a small but important
group of them, called "pathogens". As all microorganisms, they are
invisible to a naked eye, so we do not see as to whether our hands are
contaminated, that means whether there are bad bacteria sitting on them. They are the ones which can cause food
poisoning or food-borne illness. Just look at some of them at left,
enlarged several thousand times by a scanning electron microscope (right: a
multisample stage holding 4 bacterial specimens). More recently, bacteria found in various unhygienic situations were examined by SEM.
 |
| The distance between these two vertical bars is 10 mm (i.e.,
1 cm) on the monitor. One millimeter is one tenth of that distance. Divide
that 1 mm into one thousand parts and you obtain 1 µm (one micrometer).
The bar at the image of the Escherichia coli
bacteria shows, how the 1 µm distance at that particular
magnification compares to the dimensions
of the bacteria. - The figure at right shows the monitor of a scanning
electron microscope (Philips XL-30 ESEM) during an examination of a thin
layer of bacteria on a bacterial filter. Micrographs obtained by electron microscopy show no colour because they are produced by a beam of electrons. For didactic purposes and appeal they may be colourized digitally.
|
| The distance between these two vertical bars is 10 mm (i.e.,
1 cm) on the monitor. One millimeter is one tenth of that distance. Divide
that 1 mm into one thousand parts and you obtain 1 µm (one micrometer).
The bar at the image of the Escherichia coli
bacteria shows, how the 1 µm distance at that particular
magnification compares to the dimensions
of the bacteria. - The figure at right shows the monitor of a scanning
electron microscope (Philips XL-30 ESEM) during an examination of a thin
layer of bacteria on a bacterial filter. Micrographs obtained by electron microscopy show no colour because they are produced by a beam of electrons. For didactic purposes and appeal they may be colourized digitally.
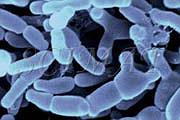
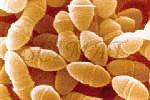 Most bacteria are harmless and many are useful to humans (e.g. bifidobacteria, shown at left) by suppressing pathogens. Many other bacteria are used to make a variety of certain foods. Streptococcus thermophilus (shown at right) likes warm milk which it coagulates, with the help of Lactobacillus bulgaricus, into yogurt. Both bacteria belong to a large group of so-called "lactic acid bacteria" (lactobacilli and lactococci). This name has been given to them because they metabolize milk sugar (lactose) in milk and
produce lactic acid. This acid coagulates milk proteins and thus
produces yogurt, cultured buttermilk, and other fermented milk products.
Most cheeses could not be made without bacteria. Lactic acid bacteria
including leuconostocs also participate in the production of sauerkraut
whereas acetic acid bacteria (Acetobacter aceti) are used to
produce "organic" vinegar. Because of their favourable effects on human
health, lactic acid bacteria and bifidobacteria are called "probiotic
bacteria".
Most bacteria are harmless and many are useful to humans (e.g. bifidobacteria, shown at left) by suppressing pathogens. Many other bacteria are used to make a variety of certain foods. Streptococcus thermophilus (shown at right) likes warm milk which it coagulates, with the help of Lactobacillus bulgaricus, into yogurt. Both bacteria belong to a large group of so-called "lactic acid bacteria" (lactobacilli and lactococci). This name has been given to them because they metabolize milk sugar (lactose) in milk and
produce lactic acid. This acid coagulates milk proteins and thus
produces yogurt, cultured buttermilk, and other fermented milk products.
Most cheeses could not be made without bacteria. Lactic acid bacteria
including leuconostocs also participate in the production of sauerkraut
whereas acetic acid bacteria (Acetobacter aceti) are used to
produce "organic" vinegar. Because of their favourable effects on human
health, lactic acid bacteria and bifidobacteria are called "probiotic
bacteria".
|